I had an idea and i just went with it... the medium is pencil and sharpies... the canvas is my computer...
Here is a new video of me adding new art to my computer.
its just a short time lapse of me adding the hindu god Shiva riding huge tsunami wave on a surfboard right into what appears to be some city that vaguely resembles San Francisco as the earth crumbles and cracks in the foreground...
the music in the video was made by my friend Lake Monster...
thanks for reading. subscribe and comment please. suggestions and feedback appreciated.
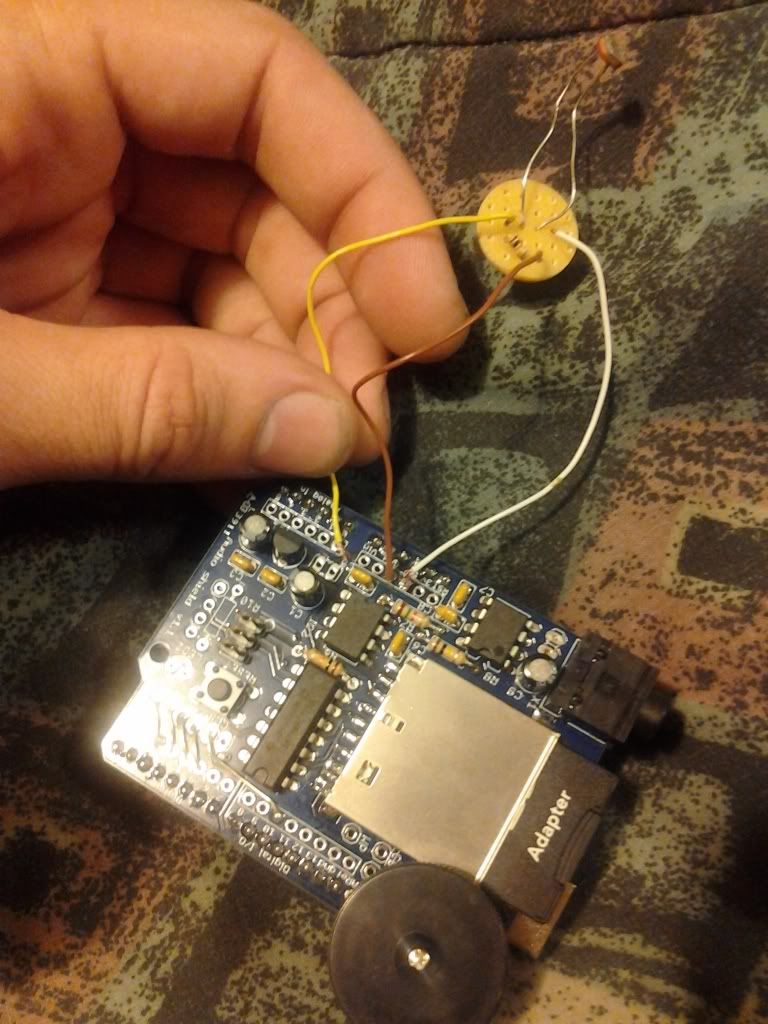
I recently made this as a christmas present for a friend. it's a gift that plays audio files when it opened. I made it with an arduino, a wav audio shield, a photoresistor, a 10k ohm resistor, some wire, solder, and a little bit of pcb.
you can pick up a wav audio shield online fairly easily... order this handy shield, solder it together and the rest of this project is super simple...
You put the audio files onto an sd card as .wav files, and then you put the sd card into the wav shield. You can either download wav files or you can create your own with your favorite digital audio workstation type program.
the arduino runs code that detects the voltage from the light sensor, and based on that reading, turns the audio on and off.
The end result: a gift that says or plays whatever you want it to when its opened, and you can stop the audio and skip to the next track by closing the gift.
Below is a simple schematic that show how to build this. you should only need 3 wires to set up the light detection.
in the pictures above, i have a white wire going to 5 volts, the brown wire going to ground, and the yellow wire going to analog input 0.
i have drawn it as red, black, and green in the diagram to the right.
once you get everything wired up, have your own audio loaded on the SD card and upload the code to your arduino, you should have a very personalized gift to give. this is perfect for holidays, birthdays, special events, jokes, pranks, and sincere messages of thanks...
there are also plenty of outputs left on the arduino for controlling lightsor any other sort of bells and whistles you'd like to add to this project...
you can see it in action in the video below...
thanks for reading. subscribe and comment please. suggestions and feedback appreciated.
I've been adding art here and there to my computer for a while now. I haven't finished it yet but I'm getting there...
it's mostly done in colored markers, but it has some pencil and colored pencil as well. I might add some paint to it later on...
I recently thought it would be cool to take a universal remote control made for a tv/dvd/vcr/etc... and turn it into a midi controller for my computer, using an arduino, the aforementioned universal remote control, and an infrared receiver.
all you need to do to set it up is get an infrared receiver and connect the infrared receivers pins to the arduino. put pin 1 (the ir receivers output) to digital input 11, connect pin 2 into to ground, and connect pin 3 to 5 volt current on the arduino.
Next you are going to need to find a TV remote, or DVD remote, a universal remote, or some kind of remote... any kind will work.
Once you've found one, you should download and install the IRremote library to your arduino's libraries folder. here is a link to download the zip folder of the IRremote library
anyway,you just download the zip file and unpack it to the arduino/hardware/libraries folder...
once you have it installed and see it in the arduino programs libaries directory, you are ready to use the library in your code.
first off, you'll want to open up the example .pde file called IRrecvDemo
once you have this open, it should look like this.
--------------------------------------------------------------------------------------- /* * IRremote: IRrecvDemo - demonstrates receiving IR codes with IRrecv * An IR detector/demodulator must be connected to the input RECV_PIN. * Version 0.1 July, 2009 * Copyright 2009 Ken Shirriff * http://arcfn.com */
#include <IRremote.h>
int RECV_PIN = 11;
IRrecv irrecv(RECV_PIN);
decode_results results;
void setup() { Serial.begin(9600); irrecv.enableIRIn(); // Start the receiver }
void loop() { if (irrecv.decode(&results)) { Serial.println(results.value, HEX); irrecv.resume(); // Receive the next value } }
upload the IRrecvDemo code to your arduino board, and open the serial monitor once its done uploading...
with the serial monitor open, and the IR receiver connected to the arduino... you should be able to get the IR signal codes from the remote control now... point your remote at the IR receiver, and push some buttons... You should start to see different numbers appear in the serial monitor.
you can write these numbers down, and create code for your arduino that will enable you to make it do something when it detects you've pressed a button on the remote. you can code the arduino to do anything you want... You can make it so that when you push a button, a motor turns on/speeds up/slows down, or make something turn on and off, or control a machine or robot, or send commands to your computer, or whatever else you can imagine it doing... you can pretty much program the remote to do any damn thing you can imagine...
i imagined using it as a MIDI controller to use with my audio programs on my computer... so thats what i'm doing. so far, i've programmed only 1 button on the controller to send a MIDI signal... the power button. I will eventually write code that turns the whole remote into a very versatile music controller.
my name is kurt. I'm always working on something. this is a blog for documenting my work.
for starters, you can check out all the different music i have up online around the internet... https://on.soundcloud.com/Guew8mzWrntHNy9z9